An XMind-style mind map plugin. Markdown is the single source of truth: headings and list items are the nodes, and the mind map view is just another editor for the same .md file, so edits on either side show up on the other. No runtime dependencies; works on both desktop and mobile.
The interface follows Obsidian's language setting — English, or Simplified Chinese when Obsidian is set to Chinese.
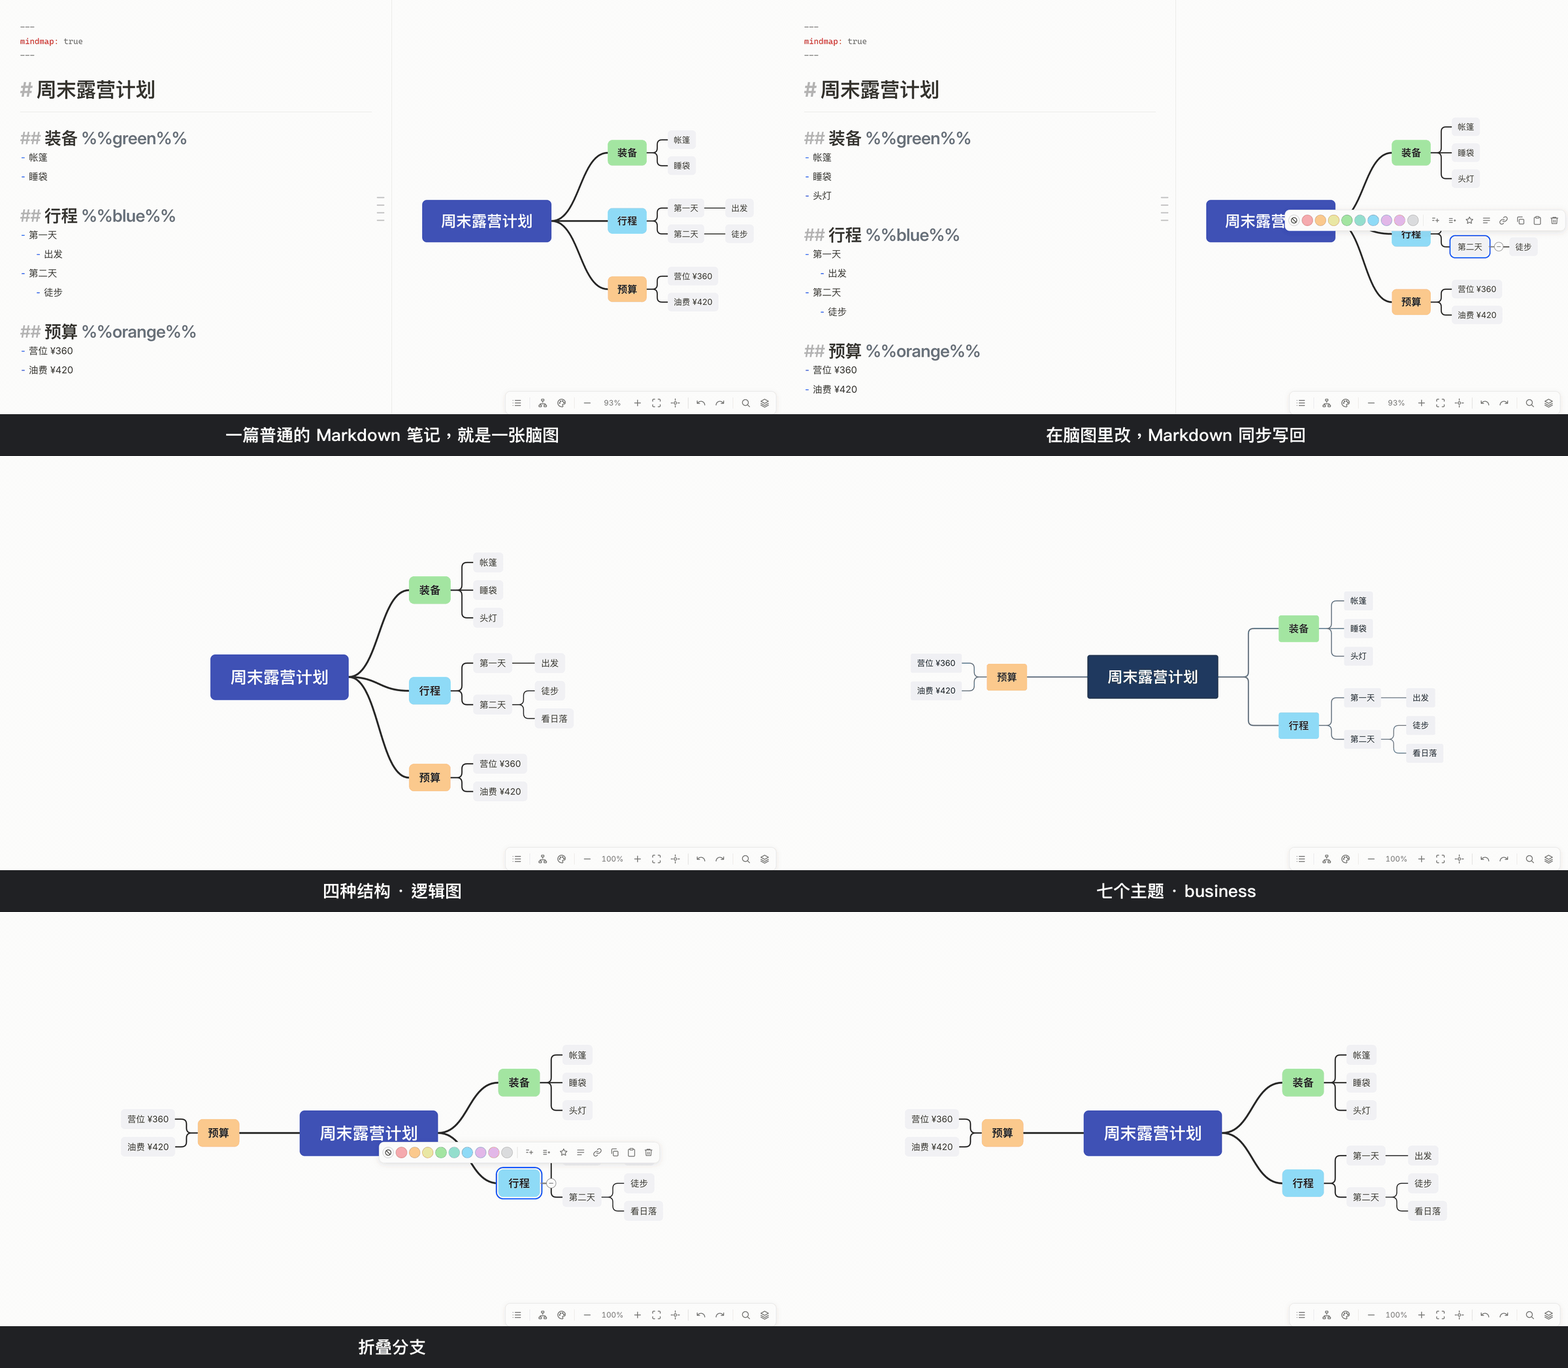
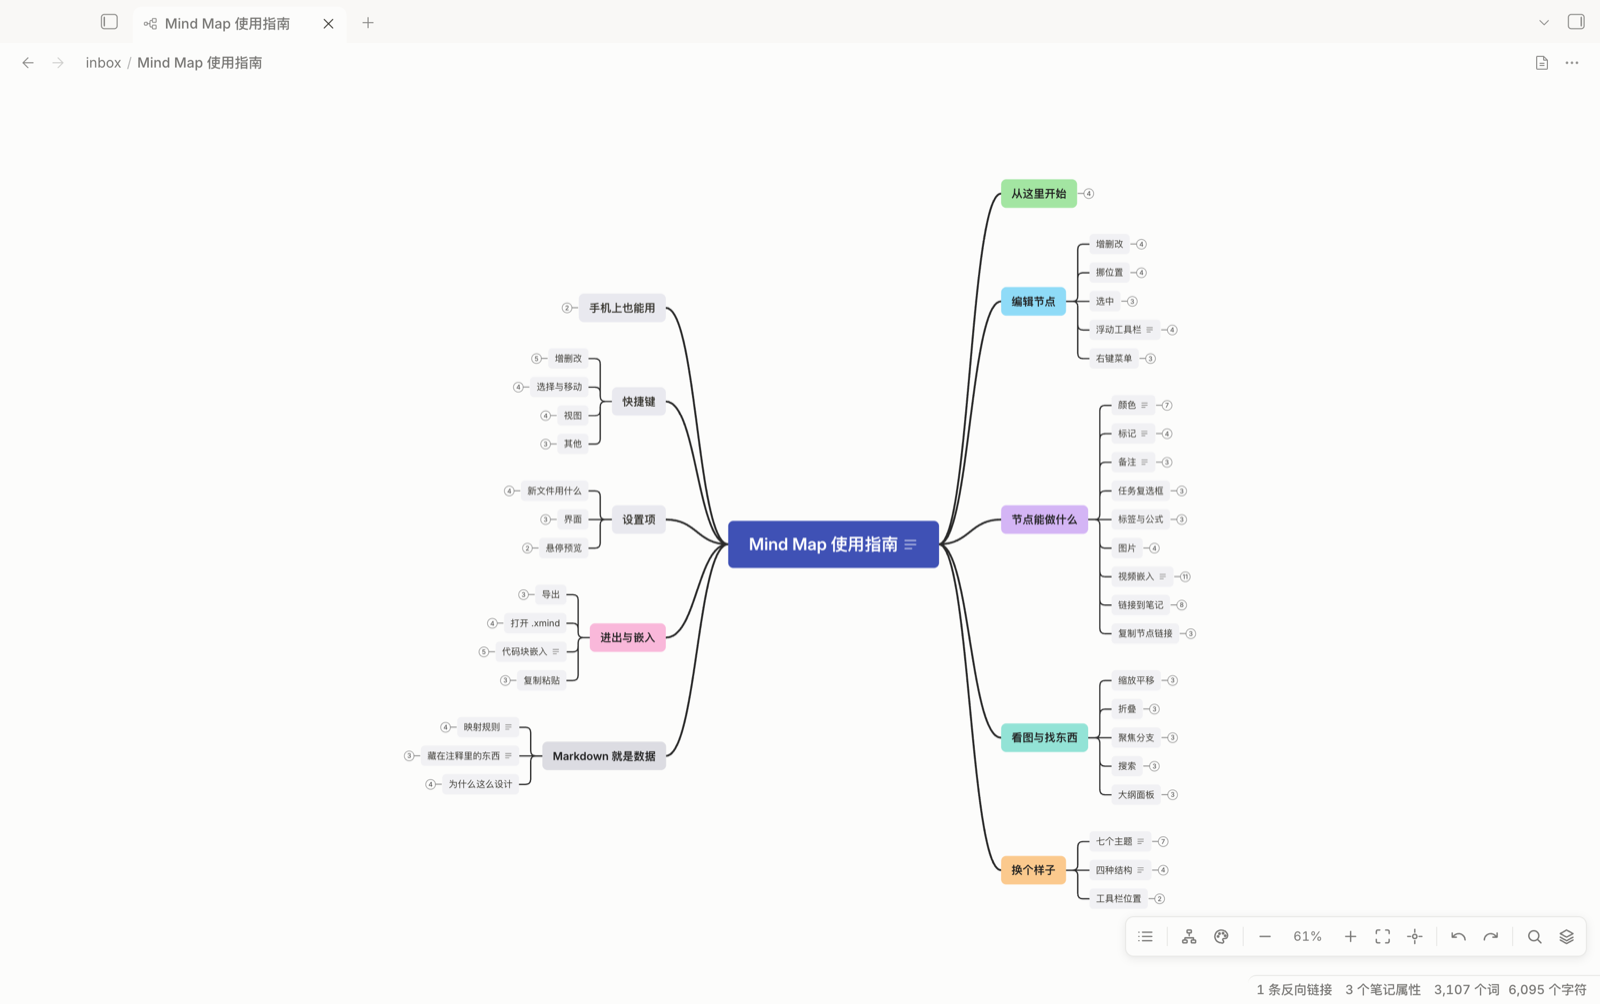
Usage
[!tip] For a quick start, copy the
examples/folder into your vault (the notes are in Chinese). Mind Map 使用指南 (Mind Map user guide), opened as a mind map, is a clickable, foldable map of every feature, demonstrated by the plugin itself. 脑图代码块嵌入示例 (code block example) is an ordinary note withmindmapblocks embedded in it. The folder also has a typical mind map, a meeting note with an embedded map, and an.xmindfile to try the import.
- Command palette → New mind map, or add
mindmap: trueto the frontmatter of any note. To start new maps from your own structure, pick a note in the "Template for new mind maps" setting: its content is copied in, with{{title}},{{date}}and{{time}}(also{{date:YYYY-MM-DD}}with a format) filled in like the core Templates plugin, andmindmap: trueadded to its frontmatter. Leave it empty to start with Topic 1/2/3. - Notes with this key open as a mind map by default. Switch back and forth with the button in the top-right corner of the view, the command Toggle between mind map and Markdown, or the file context menu. Switching keeps your place: with a node selected, Markdown opens at its line; with the cursor on a node in Markdown, the map selects it and centers it. Right-click a node → More → Show in Markdown (also a command you can bind) jumps straight there. Reopening a map restores its last position, zoom and selection, kept on this device only and not synced (turn off "Remember where you left off" in settings); with nothing remembered, the "When opening a map" setting decides whether to fit the whole map (default) or show the central topic at 100%. With the same note open as a map and as Markdown side by side, turn on "Sync with Markdown side by side" (off by default): selecting a node scrolls the Markdown to its line without taking focus, and moving the cursor to another line in Markdown selects the matching node. The same works when the Markdown is in reading view: selecting a node scrolls to that block or list item (expanding collapsed headings), and clicking a block or list item in reading view selects the matching node. When the cursor lands in a branch that is collapsed in the map, the collapsed ancestor gets selected; turn on "Expand collapsed nodes when syncing" to expand down to the node instead. To keep Markdown folded the way the map is, turn on "Fold Markdown along with the map" (off by default): branches collapsed in the map are folded in the editor and reading view too, and unfolded when you expand them; folds you make yourself in Markdown are left alone. Each jump briefly highlights the line or the node, so you can see where it landed. To keep one map pane beside the editor as a live view of whatever you are writing, turn on "Follow the active note" (off by default): switching to another note in the editor shows it in the map as well, without writing
mindmap: true; a pinned map tab stays put. Switching a regular note to a mind map addsmindmap: trueso it keeps opening that way; turn off Remember the mind map view in settings to switch only the current tab and leave the file alone. To write and watch side by side, use Markdown and mind map side by side (command palette, the file context menu, the ⋯ menu of a mind map tab, or right-click on empty canvas): Markdown on the left, the map on the right, following your typing as you go. It works from either view; a mind map note that is showing as a map switches to Markdown on the left. Nothing is written to the file. - In a regular note, write a
```mindmapcode block containing the same kind of Markdown, and it renders as a small mind map in both Reading view and Live Preview. It's read-only by default. Click the pencil in the toolbar or double-click a node to start editing. Changes are written straight back into the code block, and undo and redo only apply within the block. Turn on "Hide the toolbar of embedded maps" (off by default) for a cleaner look: embedded maps (code blocks and![[note]]embeds) show no toolbar in reading view, and in editing view it appears only while the mouse is over the map or while you edit it. - Put an
.xmindfile in your vault and open it directly: it renders read-only, you can switch between sheets, and one click in the top-right corner does Convert to Markdown note. Bothcontent.json(XMind Zen / 2020 and later) andcontent.xml(XMind 8) are supported. Boundaries, summaries (including topics hanging off a summary), callouts, relationships and floating topics on the central topic come along; comments aren't supported yet, and a note in the top-right corner says how many were left out. - From the view menu (⋯ in the top-right corner) or the command palette: Export as PNG, Export as SVG, Copy as image. PNG is exported at 2× resolution, and Obsidian's bundled Inter font is embedded, so the export matches what you see on screen.
Embedding a mind map in a note
Any note can hold a small mind map: write a mindmap code block with the same Markdown a mind map note uses. It renders in Reading view and Live Preview, and you can edit it in place (click the pencil or double-click a node).
The block can also be named gogoga-mindmap; it works the same. If you also use Markmind, which claims mindmap blocks too, turn off "Render ```mindmap code blocks" in settings to leave mindmap to Markmind and use gogoga-mindmap for your own maps.
```mindmap
# This week

## Product
%%blue%%

- 1️⃣ Requirements review
- 2️⃣ Prototype walkthrough

## Engineering
%%green%%

- ⏳ API integration
- ✅ Analytics shipped

## Risks
%%red%%

- ❗ Design not final
```
A block can carry its own frontmatter that applies only to that block, for example a different structure and theme:
```mindmap
---
mindmap-structure: org-down
mindmap-theme: business
---

# Release

## Test

## Regression

## Canary

## Rollout
```
To show a mind map you already have, embed the file like any other note: ![[Product launch]] for a mind map note, or ![[Competitors.xmind]] for an XMind file. It shows a read-only preview that follows the file as it changes; click the open button in its toolbar, or double-click a node, to open the file and edit it. Point at a node to show only that branch: ![[Product launch#Timeline]] (a heading path like #Team#September works too) or a block reference ![[Product launch#^abc123]]; a breadcrumb lets you step back up to the whole map. Dropped onto a Canvas, a mind map note fills its card and refits when you resize it. Notes without mindmap: true embed as usual.
Letting AI write mind maps
Since a mind map is plain Markdown, any AI that can write a note can write a map. skills/gogoga-mindmap/SKILL.md tells it the rest: which lines become nodes, the frontmatter for structure and theme, and how to write colors, folding, boundaries, summaries and callouts. In Claude Code, or another tool that supports Agent Skills, copy the skills/gogoga-mindmap folder into its skills folder (for Claude Code, ~/.claude/skills/), then ask for a mind map of a topic or a note. With other AI tools, paste the file's content into the conversation as instructions.
Editing
- Click to select, double-click to edit. A selected node shows a floating toolbar above it: 9 colors, edit note, and delete. Choose which colors it offers in the "Node colors" setting: built-in names (which follow the theme and dark mode) or hex values like
#ff8800(which stay fixed), separated by commas. If it gets in the way of clicking nearby nodes, turn off "Floating toolbar on selected nodes" in settings; the same actions are in the context menu. - Drag a node onto another node, or into the empty space just behind it, to make it a child of that node, or into a gap in a column of children to insert it at that position. In the left-and-right layout you can also drag it to the other side. Near the edge of the canvas the view scrolls along.
- Center the selected node setting (off by default): clicking a node, moving with the arrow keys, or adding a node with Tab / Enter glides the selection to the middle of the canvas; multi-select, box-select and dragging leave the view alone.
- Shift-click to add to the selection, ⌘-click to toggle, Shift-drag on empty space to box-select, ⌘A to select all. With multiple nodes selected, color, delete, dragging and Alt+arrow reordering / promoting / demoting apply to the whole group (drag any one of them and the rest come along). Coming from XMind? Set Settings → Left-drag on empty space to "Select": a plain left-drag draws the selection box, right- or middle-drag pans, and a right-click on empty space still opens the menu.
- Click ≡ on a node to view its note, or use the note button in the toolbar to edit it. Notes support Markdown and stay directly under the node when written back. While editing a note you can paste or drop images: they are saved as attachments and inserted at the cursor. Pasting an image while editing a node's text adds it to that node's note. Drag the bottom-right corner of the note popover to resize it (the size is remembered); clicking Edit keeps the popover where it is and at the same size. Click an image in a note to view it full-screen (Esc or click anywhere to close).
[[Links]]in a note open when clicked (⌘/Ctrl-click for a new tab) and show a page preview on hover. To remove a note, right-click the node → Delete note. Turn on "Preview notes while editing" (off by default) to see the rendered note next to the text box as you type (below it when the window is narrow). - Reading PDFs: copy a selection in PDF++ (the default format is fine), select a node in the map and press ⌘V. It pastes as one node: the quoted text, linked to that selection in the PDF. With the PDF open in a tab beside the map, clicking the node jumps there and highlights the passage, and the map stays put. A rectangle copied from PDF++ (
![[book.pdf#page=…&rect=…]]) shows as the cropped image, resizable and viewable full-size like other images; the ↗ button in its corner (shown on hover or when selected) jumps back to that spot in the PDF (crops need PDF++; without it they show as a link to the page). To excerpt in a row, run Toggle PDF auto-excerpt into this mind map: every link PDF++ copies is then added under the selected node with no pasting, the selection stays put, and clicking another node sends the next ones there. With Auto-copy on in PDF++, making a selection is enough. The highlighted button in the view header stops it. - Numbered siblings: right-click a node → More ▸ Number siblings (1. 2. 3.), or the command Number the selected nodes and their siblings (on / off). Numbers show in front of the text and update when you add, delete or move nodes; list items are stored as a Markdown ordered list, headings get
%%num%%after their parent heading. With "Start numbering by typing 1." on, typing "1. " at the start while editing also starts numbering. - Tables inside nodes: right-click a node → Insert ▸ Insert table to draw a table in the node box, under its title, and edit cells right there: type to replace, double-click or Enter to edit the existing text, Enter / Tab to move, Esc to go back to the canvas and keep moving between nodes with the arrow keys. Column widths, cell colors, merged cells, row and column handles (drag to reorder, click for the menu), the right-click table menu, copy and paste with Excel or Feishu and ⌘Z all work like in the gogoga Table plugin, without installing it. The table lives in the node's note as a plain Markdown table (widths and colors go in one comment line under it), with
%%table%%added after the node; for a node that holds only a table, right-click → Insert ▸ Child node with a table (no title needed); the menu of the table's top-left button can delete the table and keep the node; for a node whose note already has a table, right-click → Insert ▸ Show table in node, and More ▸ Move table back to note / Delete table. The rest of the note stays a note. Tables are read-only while the map is locked. Columns you haven't resized are at most 240 wide and wrap their text; a table larger than "Maximum width / height of tables in nodes" (640 / 480 by default, on the Notes settings page) scrolls inside the node with its header kept at the top; scrolling anywhere on such a node scrolls only the table, and the node stays put. - Expanded notes: click the note button in the toolbar (or the command Expand / collapse notes) to show notes in a box right under their nodes. The nodes around make room, so a note never covers nodes or lines; a note wider than its node that would get in the way of the child lines goes below the whole branch, with a dotted line back to the node. In org charts and trees the lines to the children start below the note. Notes taller than the maximum height (setting "Maximum height of expanded notes", 240 by default) scroll inside the box, and the canvas moves once you scroll past the end. Double-click a box to edit it in place; click ≡ on the node or the collapse button on the box to hide just that one. Boxes are at most 320 px wide (setting "Maximum width of expanded notes"; wider boxes show images larger); drag the bottom-right corner of a box to give that note its own size, double-click the corner to reset. Which notes you hid and the sizes you dragged are remembered per file, and follow a node when you rename or move it in the map. Each file remembers whether its notes are expanded, and the "Expand notes" setting (off by default) is the default for files you haven't switched; the per-file choice is kept in
state.jsonin the plugin folder, separate from the settings, not in your notes. PNG/SVG exports include the expanded notes. - ⌘F searches nodes: matches are highlighted, Enter / Shift+Enter jump between results and center them, and collapsed ancestors expand automatically.
- ⌘C / ⌘X / ⌘V copy, cut, and paste subtrees. The clipboard holds Markdown as an indented list, so you can paste it anywhere. It includes the map's
%%…%%markers (width, folding, callouts…) unless you turn on "Copy nodes without map markers"; pasting back into a map restores them either way. The other way round, paste a list, headings, or plain text lines, and they become children of the current node, following their structure. - The level button in the toolbar: Expand all, Show main topics only, Show up to level 2 / Show up to level 3.
- While editing a node, formatting shows as it will look, like Obsidian's Live Preview: bold, italic,
==highlights==, strikethrough, inline code, text colors and highlighter colors render in place and their markers (**,<span …>) are hidden. Markdown markers like**and==show when the cursor is on them and stay visible while you select; color tags always stay hidden so the node doesn't reflow, so change colors with the format bar or commands, or switch to Markdown to see the source. Turn on Keep format marks hidden while editing (off by default) to keep bold and highlight markers hidden too, so the line width doesn't jump when the cursor is next to them. Deleting never splits a hidden marker pair: Backspace after formatted text removes its last character, and the markers go once it is empty. Links, math and images still show their source while editing. Callouts, summaries, relationship labels, boundary titles and renaming in the outline panel use the same editor. - While editing, Shift+Enter inserts a line break. Multi-line text is stored as
<br>in the heading or list item and renders normally in Reading view. - Touch: one finger to pan, two fingers to zoom, tap to select, press and hold for 0.4 seconds then drag to change a node's parent. Buttons get larger automatically on touch screens.
- Outline panel: the leftmost toolbar button or the command Toggle outline panel opens a tree list on the left, linked both ways with the canvas. Formulas in titles render as formulas; turn on "Show full titles in the outline" to wrap long titles instead of cutting them off.
- Lock editing: the lock button next to it (or the command Lock / unlock editing) makes the map view-only, so dragging the canvas can't move nodes by accident. Zoom, pan, fold and search still work, folding while locked isn't written to the file, and the lock is remembered per file in the plugin's
state.json, not in the note. In the panel: ↑↓ to move, Tab / Shift+Tab to demote / promote, Alt+↑↓ to reorder, Enter to add a sibling and rename it in place, Delete to delete, Space to fold. On the canvas, Alt+arrow keys likewise reorder, promote, and demote. - Link nodes to notes: press ⌘K or click the link button in the toolbar, then pick an existing note or create a new one. The label becomes
[[note|original text]], and a newly created note opens in a split on the right. Press ⌘K again on a linked node to open or remove the link. Hold ⌘ and hover for a page preview. - Structures: logic chart (rightward), mind map (left and right), org chart (downward), tree chart, and five timelines. Switch them from the structure menu in the toolbar: Logic chart (rightward), Mind map (left and right), Org chart (downward), Tree chart, Timeline (horizontal, one side), Timeline (horizontal, alternating), Timeline (vertical, rightward), Timeline (vertical, leftward), Timeline (vertical, alternating). A timeline strings the main topics in order along an arrowed axis with their content hanging beside it (an indented list on horizontal timelines, a logic chart on vertical ones); alternating puts neighboring branches on opposite sides so more fits on screen. Drag main topics to reorder them along the axis.
- Typing links: while editing a node, type
[[(or【【with a Chinese input method) and a list of vault files pops up; keep typing to filter, ↑↓ to pick, Enter to insert[[note]]. Or select some text and type[(or【) to wrap it in brackets; type it again to turn it into a[[link]]. - Custom themes: Settings → Custom themes → New, start from a built-in theme and adjust four levels (central topic, main topics, subtopics, level 3 and deeper): font size, bold and italic, text color, background (or underline), corner radius, border, maximum width (short text keeps its own width, longer text wraps) with an optional "align widths in this level", and the color and width of the line into that level. Overall you can set the line type, corners, dashes, one color per branch, and spacing. A live preview sits on the right, and dark-mode colors are derived automatically. Saved themes show up in the palette menu next to the built-in ones.
- Spacing and text size: the "Node spacing" and "Node text size" settings scale the gaps and the node text of every theme, custom ones included (100% is the theme's own look). Smaller values fit more on screen.
- Line style: the line button next to the palette picks curved, right-angled or straight lines, dashed or solid, and rounded or sharp corners for this note, independent of the theme (
mindmap-edge,mindmap-edge-dash,mindmap-edge-cornerin the frontmatter). - Themes: switch with the palette button in the toolbar. Seven themes: Snow (the default: dark center with gray node backgrounds), Rainbow (one color per branch), Business (blue tones with right-angle elbow lines), Warm (orange tones with large rounded corners), Mono (black-and-white outlines with thin lines), Line (text-only nodes with thin elbow lines), and Forest (green-toned branches).
Your choice is written to
mindmap-themeand applies per file; the Default theme setting changes the theme for new files. Every theme has a dark mode. - Math and images:
$E=mc^2$in a label renders as math, and$$…$$renders in display style. For multi-line formulas use\begin{aligned}…\end{aligned}with\\line breaks, or put a$$block in the note.![[image.png|160]]orrenders as a thumbnail, where the number is the width; select it and drag the handle in the bottom-right corner to resize (the size of images without a width, and how wide you can drag, are the "Default image size" and "Maximum image width" settings on the Opening and display page). Double-click an image to view it full size (click or press Esc to close). Code blocks in notes get syntax highlighting. Math and images are embedded when exporting PNG/SVG. - Context menu: available on nodes and on empty space. The first level of the node menu holds the everyday actions (edit, add child or sibling, expand or collapse all sub-branches, link, note, callout, markers, task, boundary, summary, copy and paste, delete); related actions sit in submenus: Insert ▸ (insert before, insert parent), Fold & view ▸ (fold or unfold, expand one level, collapse one level, show next level only, focus on branch, zoom to branch), Boundary ▸ and Summary ▸ (once the node has one), and More ▸ (convert level to headings or lists, split into subtopics at commas, make floating topic, copy node link, show in Markdown).
- Split at commas: right-click a node → More → Split into subtopics at commas turns "apples, pears; plums" into three subtopics, splitting at Chinese and English commas, the Chinese enumeration comma and semicolons. Commas inside links, math and code, and in numbers like 1,000, are left alone; the node keeps its own text.
- Focus on a branch: show one branch on its own as if it were the root. The breadcrumb at the top takes you back to the full map or any ancestor in one click; Esc also exits.
- Markers: the star button in the node toolbar opens a picker with five groups, Priority, Progress, Flags, Symbols, and Recite (the 🙈 answer marker, see recite mode). Markers are stored as emoji at the start of the text, so they display anywhere. Add your own in the "Custom markers" setting (emoji or symbols separated by spaces): they show up as a Custom group, optionally limited to one per node. Letters, digits and ASCII symbols are ignored, since node text often starts with them.
- Recite mode: the eye button in the toolbar, or the command "Toggle recite mode", turns a map into review cards. It only changes what you see and never writes to the file.
==Highlights==(or<mark>highlights</mark>) in nodes hide their text but keep their highlight color, with a line under them, and you click to reveal; a node whose children are written as[x] right answer/[ ] wrong answerbecomes a quiz question: every question gets a "Single" or "Multiple" tag (one or more right answers), and all options look unchecked until you click the tag, then right answers turn green and wrong ones fade. Clicking the question itself just selects it. Children of the options (say, the reasoning) stay covered until the answer is revealed. Mark a node with 🙈 (the Recite group in the marker picker) to make it an answer: in recite mode it is covered along with its children, images, notes and callouts included, until you click it, and clicking again covers it back. That works for screenshot questions too: put the question image in one node and the answer image in a 🙈 child. - Relationships: right-click a node → Add relationship (or the command of the same name), then click the node to connect to (Esc or a click on empty space cancels). A dashed arrow joins the two, curving around the map. Click the line to select it, double-click it to type a label (Enter to finish), and drag the label (or, for a line without one, the dot that appears when it's selected) to change the curve; a selected line also shows a control handle near each end, which you can drag to shape the start and end of the curve separately, and the handles move with their nodes. Right-click the line to go to its start or end (selects that node and centers it), edit the text, reverse the direction, reset the curve or delete it; Delete removes a selected line too. Lines whose end is folded away or hidden aren't drawn, deleting a node removes its lines, and PNG/SVG exports include them. Stored as
%%rel=r1 "Text"%%on the start node and%%id=r1%%on the end node (plusc=40,-60for a dragged curve, orc1=40,-60 c2=-30,-50once the handles have been dragged), so renaming or moving either node never breaks the line. - Summaries: select one or more adjacent siblings and right-click → Add summary (or the command "Add or remove a summary") to draw a curly brace on the outer side of them and their branches, with a short summary after it; type the text right away. The text is inline Markdown like node text, so links, bold and the like work. Double-click the summary to edit it, right-click it to remove it, and drag the small bar on its outer edge to set its width (double-click the bar to go back to automatic). To change what it covers, click the summary text (or hover it): handles appear at both ends of the brace; drag either one onto a sibling. The context menu also has "Extend range by one node" and "Shrink range by one node". Stored as
%%summary=2 "Text"%%on the first node, plussw=240for a dragged width; included in PNG/SVG exports. - Summary topics: a summary can have its own subtopics (XMind's summary topic). Click the summary text and press Tab, or right-click the summary → Add subtopic: the summary text becomes a node (the summary topic) with a subtopic under it, and from then on it edits, takes children, folds and accepts dropped nodes like any node. When it's taller than the nodes it covers, the siblings above and below make room instead of overlapping. A summary topic follows the range it covers, so it can't be dragged or moved up and down on its own and has no siblings; change the range or remove it from the Summary ▸ submenu, and Convert to plain summary when it has no children. Deleting the first covered node hands the summary to the next one; deleting them all leaves the summary topic behind as an ordinary node, subtree included. In Markdown it's the item right after the last node it covers:
- Notes %%summary-topic=2%%(=2is how many preceding siblings it covers), with its subtopics written under it as usual; the outline panel lists it in that spot too. - Hide nodes: right-click a node → More → Hide in mind map to keep it (and its branch) out of the map while it stays in the note; it's stored as
%%hide%%, and you can also type that yourself. When a map has hidden nodes, the toolbar shows Show hidden nodes (also a command): turn it on to see them faded with a dashed outline, and right-click → More → Unhide to bring one back. - Only headings as nodes: turn on the setting of the same name and maps of notes use only headings as nodes; the lists and paragraphs under a heading become its note, kept exactly as written. New nodes are written as headings (down to level 6). Code-block maps are not affected.
- Callouts: a small bubble next to a node, like a note you can always see. Right-click a node → Add callout (or the command "Add / edit callout") and type; Enter to finish, Shift+Enter for a new line, Esc to cancel. The text is inline Markdown; double-click the bubble to edit it, right-click it to remove it (clearing the text removes it too) or pick Callout color to fill it with one of the node colors, which makes an important callout stand out. Bubbles sit above their node (to the right in the org chart) and the layout makes room for them, so they never cover other nodes or lines; when a bubble is wider than its node and would block the lines to its children, it goes above the whole branch with a thin pointer back to the node. If a map gets busy, click the bubble button in the toolbar (or the command "Show / hide callouts") to hide them all: the layout goes back to how it looks without callouts, and a small icon on the node shows that one on click. Each file remembers whether callouts are shown (kept in the plugin's
state.json, not in the note). Stored as%%callout "Line one<br>Line two"%%on the node (withcc=yellowafter it when the callout has a color); straight double quotes become curly quotes. Search finds callout text, PNG/SVG exports include visible callouts, and callouts in .xmind files are imported. Callouts live in a%%comment, so they don't show in Markdown reading view. - Floating topics: topics that aren't connected to the central topic and can sit anywhere on the canvas, as in XMind. Double-click empty space, or right-click it → New floating topic here; right-click a node → More → Make floating topic to detach it with its branch in place. Drag a floating topic to move it; drop it on a node to attach it there, or right-click → More → Attach to central topic. Enter on a floating topic adds another one below it, and Tab adds subtopics as usual. Turn on "Drag a topic to empty space" in settings to pull topics out by dragging, XMind style (off by default, so dropping on empty space still cancels). In the left/right mind map structure, floating topics to the left of the center grow leftward. A floating topic is stored as an ordinary section under the central topic with a
%%float x=320 y=-80%%marker, so it stays readable in Markdown; it's hidden while focusing a branch. Lines between floating topics aren't supported yet, and the main map doesn't push floating topics aside as it grows. - Boundaries: click the boundary button in the node toolbar, press ⌘⇧B, or right-click a node → Add boundary to draw a dashed frame around it and its branch. Select several adjacent siblings first to frame them together. To add or edit a title or remove the boundary, right-click anywhere on the empty space inside it, or click the boundary button again on a framed node; double-clicking inside the boundary edits the title directly. Click empty space inside a boundary to select it: handles appear at both ends, and dragging them grows or shrinks the range (the context menu can also extend or shrink it by one node). Boundaries are included in PNG/SVG exports.
- Node width: select a node and drag its outer edge (the whole edge works) to set the width; the text rewraps and the height follows. Double-click the edge: a node with a set width goes back to automatic width (also right-click → Reset to automatic width), and an automatic-width node whose text wraps is stretched to one line (up to 1200). Stored as
%%w=240%%. Turn on Resize width from the right edge on hover (off by default) to drag or double-click the edge of any node without selecting it first. - Task checkboxes:
[ ] itemrenders as a checkbox; clicking cycles between incomplete, complete, and removed. - #tags: a
#tagin a node renders in tag style; clicking it opens global search. - External links:
[text](https://…)or a bare pasted URL becomes a link that opens in the browser when clicked. Trailing punctuation isn't swallowed into the link. - Video and other iframe embeds: paste an
<iframe …>copied from Bilibili or YouTube straight into a node and it renders as a player. Only the iframe tag is accepted, andsrcmust be http(s). Attributes are parsed separately and the element is built with the DOM API, never innerHTML. Autoplay is off by default (autoplay=0is added at render time without touching the note; writeautoplay=1yourself if you want autoplay), and players in collapsed branches aren't loaded. Embeds also work in notes, rendered by Obsidian's own renderer. A shield covers the player: a single click only selects the node, and the player is released only when you double-click it or click the Activate button in the bottom-right corner, so a stray click doesn't send you to the source site. An activated node gets a dashed outline and is deactivated when you click elsewhere. When selected, drag the handle in the bottom-right corner to resize (aspect ratio is locked by default; hold Shift to change height only; double-click to reset to 560×315). - Drag in and paste: drag a note from the file list onto a node to add it as a
[[link]]child. Dropped or pasted images (⌘V, the context-menu Paste, or the toolbar paste button, e.g. a screenshot or an image copied from a web page) are saved to the attachment folder and become image nodes. Right-click an image node and choose Copy image to put the image itself on the clipboard, ready to paste into other apps. While editing a node, select text and paste a web address or a local file path to turn it into a[text](address)link; turn on Fetch page titles for pasted links to have an address pasted with nothing selected use the page title as its text. - Copy node link: heading nodes give
[[note#heading]]; list nodes get a block ID added automatically and give[[note#^id]], which you can reference from other notes. Clicking such a link in a map selects and centers the node it points to (unfolding its parents), and links from other notes open the map at that node. - Mobile: the node toolbar has add child and add sibling buttons, and the bottom toolbar has undo and redo, so you can fully edit without a keyboard.
- ⌘B / ⌘I make the selected nodes bold or italic as a whole; while editing a node, they apply to the selected text only.
- Coloring part of the text: while editing a node, select some text and use the commands "Text color 1–5", "Highlighter color 1–5", "Highlight the selected text" or "Clear text and highlighter colors" (bind your own keys in Settings → Hotkeys); outside editing they apply to the whole text of the selected nodes. Turn on "Format bar when selecting text" (off by default) to get a small bar above the selection: bold, italic, highlight, text colors, highlighter colors and clear. Change the colors in "Text colors" and "Highlighter colors" in settings, separated by commas (three of each by default). Saved as
<span style="color:#e03e3e">text</span>and<mark style="background:#ffd43b99">text</mark>(the same as the Highlightr plugin), so Markdown shows the colors too; recite mode covers highlighter colors like==highlights==. - Underline: while editing a node, select text and press ⌘U (Ctrl+U on Windows) or click U in the format bar; outside editing ⌘U applies to the whole text of the selected nodes, and there's also the command "Underline the selected text". Saved as
<u>text</u>, so Markdown shows the underline too. - Hide format tags in notes (setting, off by default): in a Markdown note's Live Preview, Obsidian shows the whole
<span style=…>,<mark style=…>or<u>tag once the cursor goes into colored, highlighted or underlined text. With this on the tags stay hidden and the formatting shows instead, as in the node editor; deleting or typing next to them keeps the tags paired. Source mode, code blocks, math and frontmatter are left alone. - Node markers in notes (setting, "Show as is" by default): when a mind map note (with
mindmapin its frontmatter) is open as Markdown, Live Preview shows the whole%%…%%marker that stores colors, folding and relationships at the end of a line in gray. Switch to "Small dot" (hover it to see the text, click it to edit) or "Hidden" (nothing shows; edit it in source mode or in the mind map). A heading's marker sits on its own line right below the heading; while hidden, that line takes no space and the dot goes at the end of the heading. Markers have to stay where they are for the mind map to read them, so while hidden, typing at the end of the line (IME included), Enter, Backspace and joining lines keep text before them and new lines after them; deleting a whole line deletes its marker too, and moving a heading up or down with "Move line up/down" takes its marker line along. Ordinary comments that aren't markers (like%%revisit%%) are left alone. - Colored highlights: Obsidian 1.15's colored highlights,
==🔴text==(🔴🟠🟡🟢🔵🟣 right after the opening==; the square 🟥🟧🟨🟩🟦🟪 work too), show in nodes in the theme's highlight colors without the emoji. While editing, the emoji is hidden like==and shows when the cursor is on it. To write them from the format bar or the "Highlighter color" commands, add emoji like 🔴 🟢 to "Highlighter colors", mixed with hex values if you like; "Clear text and highlighter colors" turns a colored highlight back into a plain one.
Markdown mapping
---
mindmap: true
mindmap-structure: mindmap   # optional: logic-right (default) | mindmap | org-down | tree-right | timeline-h | timeline-h-alt | timeline-v-right | timeline-v-left | timeline-v-alt
mindmap-theme: rainbow       # optional: snow (default) | rainbow | business | warm | mono | line | forest
---

# Central topic                ← the only H1; the file name is used if there is none (or always, with "Use the file name as the central topic" on)

A paragraph here becomes the central topic's note.

## Main topic
%%green%%                      ← %%color%% colors a node and is invisible in Reading view
### Subtopic
- Deeper levels use lists
	- One level deeper
- Fold state is stored in the file too %%fold%%
- Color names:
red orange yellow green teal blue purple pink gray, or#hex. - On a heading the marker goes on its own line right below it, so the heading text stays clean and
[[note#Heading]]links keep working. The older style with the marker at the end of the heading line is still read; it is moved to the next line when you change that node in the map, and links elsewhere that included the marker ([[note#Heading %%fold%%]]) are updated. List items keep the marker at the end of the line. - In the mind map (left and right) structure, dragging a main topic to one side pins it there with
%%left%%/%%right%%, so the other branches stay put. - Boundaries are stored in the same comment:
%%box%%frames the node and its branch,%%box=3%%also takes in the next two siblings, and%%box "Title"%%adds a title. Summaries work the same way:%%summary=2 "Text"%%; a summary with subtopics goes on the item right after the last node it covers:%%summary-topic=2%%; callouts are%%callout "Text"%%, with<br>for line breaks andcc=red(or a hex color) for the fill color. A floating topic is a child of the central topic marked%%float x=320 y=-80%%(position relative to the central topic). A relationship is%%rel=r1 "Text"%%on the start node pointing to the node marked%%id=r1%%, withc=40,-60after it for a dragged curve, orc1=… c2=…(relative to the start and end node centers) once the handles have been dragged; a node can have severalrel=. - Headings go down to H6, after which lists are used automatically. New nodes use lists from level 4 by default; change this with the Deepest heading level setting.
- Paragraphs and code blocks under a node are kept as-is as its note, and the node shows a ≡ icon you can click to view it. Text between two lists (or after a list) stays in place when written back, even though it isn't shown on the map.
- Editing in the map only rewrites the lines you changed. Everything else in the file stays byte for byte as it was: blank lines, indentation, list markers, trailing spaces (hard line breaks) and line endings. This works for mind map notes and for
mindmapcode blocks. If a merge can't be made exact, the plugin falls back to writing the whole note in its own format, as earlier versions did. - Markdown exported from XMind uses this same heading hierarchy, so it opens directly; it also works the other way, imported into XMind.
Keyboard shortcuts (when the canvas has focus)
| Key | Action |
|---|---|
| Tab | Add child node |
| Enter | Add sibling node (adds a child on the root node); Shift+Enter inserts before |
| Double-click / Space / F2 | Edit; the text is selected so typing replaces it (set "When editing a node" in settings to put the cursor at the end instead); Enter to commit, Esc to cancel |
| Delete / Backspace | Delete the selected nodes and their subtrees |
| ⌘⌫ | Delete only the selected node; its children move up into its place |
| ⌘↵ | Insert a parent node: selected siblings go into one new node, non-siblings each get their own (in the mind map view; use the context menu in code-block maps) |
| ⌘F | Search nodes; Enter / Shift+Enter to jump |
| ⌘C / ⌘X / ⌘V | Copy / cut / paste subtree |
| Shift+Enter (while editing) | Line break inside a node |
| ⌘K | Link to a note / create a new note |
| ⌘⇧B | Add a boundary around the selected nodes, or remove it |
| Alt+↑↓ / Alt+←→ | Reorder among siblings / promote or demote |
| Shift+click / ⌘+click / Shift+drag / ⌘A | Add to selection / toggle / box-select / select all |
| Drag node | Change parent or reorder |
| / | Fold or unfold the selected node |
| 1–9 / 0 | Show only N levels below the selected node / expand its whole branch; other branches stay as they are. With the central topic (or nothing) selected it applies to the whole map and fits the view |
| ⇧0 | Collapse the whole branch (the pair of 0); with the central topic (or nothing) selected, only the main topics stay visible |
| = / - | Expand / collapse the branch by one level |
| ⌘⇧0 | Zoom to the selected branch |
| Arrow keys | Move between nodes (up and down go through siblings first, then to the same level in the neighboring branch; the view follows when the selection leaves the screen; turn on Center the selected node to always glide the selection to the middle) | | ⌘Z / ⌘⇧Z | Undo / redo | | Scroll wheel / drag empty space | Pan; Shift + wheel pans sideways (set the wheel to zoom in settings → Mouse wheel; Shift + wheel then pans) | | ⌘+scroll wheel / pinch / ⌘= ⌘- | Zoom; ⌘0 to fit the canvas |
These keys are handled by the map itself. Adding a child or sibling, inserting before, inserting a parent, editing, deleting, deleting only the node, moving up or down, promoting, demoting, expanding or collapsing all sub-branches and expanding or collapsing one level, as well as folding, showing down to a level, zooming to a branch, boundaries, summaries and callouts, are also commands, so you can bind your own keys in Settings → Hotkeys (search for "gogoga Mind Map"), for example to match XMind. The built-in keys keep working; a key you bind to one of these commands takes priority, even Tab or Enter.
The node context menu has these too, so you don't need to remember the keys: Insert ▸ holds insert sibling before and insert parent, "Expand all sub-branches" and "Collapse all sub-branches" sit as a pair on the first level, Fold & view ▸ holds expand one level, collapse one level and show next level only, and "Delete this node only" is on the first level.